 Rocket Proxy
Overview
Getting started
Rocket Proxy is a fast, private proxy & VPN client for iPhone, iPad, Mac and Apple TV. There's no account to create and nothing to sign up for — install it, add a server, and connect.
The app has four tabs along the bottom:
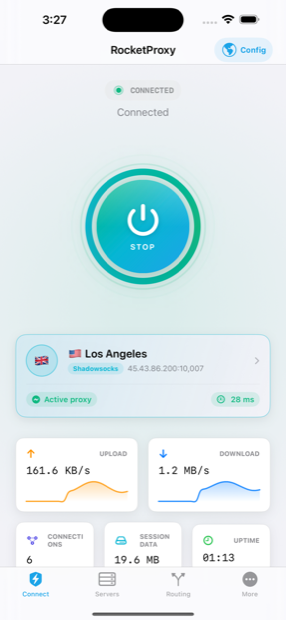
- Connect — the main dashboard: connect/disconnect, live status, speed, active connections and session data.
- Servers — add, edit, test and organise your servers.
- Routing — choose how your traffic is split between the proxy and your direct connection.
- More — DNS, ad-blocking, iCloud sync, nearby transfer, regional rules, and app settings.
Add a server
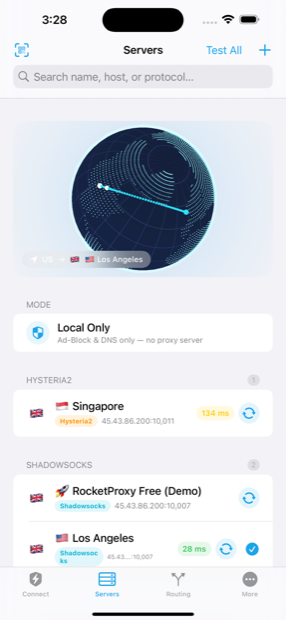
Open the Servers tab, tap +, and paste a link, scan a QR code, or import a config. No server yet? Tap Try Free Demo Server to test instantly.
Choose a routing mode
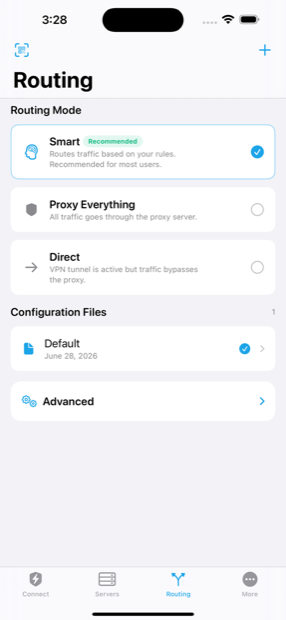
On the Routing tab pick Smart (Config), Proxy Everything, or Direct. Smart is the recommended default.
Connect
Go to the Connect tab and tap the button. The first time, iOS asks you to allow the VPN configuration — approve it and you're protected.
Servers
Add a server
On the Servers tab tap the + button to open the add menu. You can add servers any of these ways:
- Scan QR Code — scan with the camera or pick a QR image from your photo library.
- Paste Link — paste a proxy share link or a
sub://subscription and Rocket Proxy parses it automatically. - Import from Clipboard — grab a link (or a whole list of links) already on your clipboard.
- Manual Entry — fill in the server fields yourself for full control over transport, TLS, and options.
- Receive from Nearby Device — pull a server wirelessly from another Rocket Proxy device on the same network.
- Import from Cloud — restore servers previously synced to your private iCloud.
- Try Free Demo Server — adds the built-in 🚀 Rocket Proxy Free (Demo) so you can test with zero setup.
Adding a subscription URL (sub://… or a plain https:// subscription endpoint) imports all of its servers at once and can be refreshed later from the More tab.
About the demo server: it's shared and rate-limited for evaluation only. It automatically disconnects after about 5 minutes, with a short (~1 minute) cooldown before you can reconnect. For everyday use, add your own server or subscribe to Premium.
Servers
Manage servers
Everything you need to keep your server list tidy lives on the Servers tab:
- Test All — measures latency to every server at once so you can pick the fastest.
- Re-test one — tap a row's latency badge to re-measure just that server.
- Select / Use This Server — tap a server to make it active; the checkmark shows your current choice.
- Edit — open a server to change its address, transport, TLS, or name.
- Delete — swipe a row to remove it.
- Send to Nearby Device — share a server wirelessly to another Rocket Proxy device.
Swipe actions and context menus (long-press) expose the same actions. On Mac, double-click a server to connect to it directly.
Routing
Connect & routing modes
The Routing tab decides which traffic goes through the proxy and which goes out directly. Choose one of:
- Smart (Config) — recommended. Follows your active config's rules, so domestic and local traffic stays direct while everything else is proxied.
- Proxy Everything — sends all traffic through the selected server. Simple and predictable.
- Direct — nothing is proxied. Useful for pausing the tunnel while keeping DNS and ad-blocking active.
You can also run a Local-Only setup that keeps DNS and ad-blocking on your device without sending traffic to any proxy server — handy for on-device filtering.
When you tap Connect, the dashboard shows live status: current server, upload/download speed, active connection count, session data used, and uptime.
The first connection prompts you to install a VPN configuration (Settings → General → VPN & Device Management). This is standard iOS behaviour for any VPN app — Rocket Proxy keeps no logs and your traffic never leaves your device except through the server you chose.
Protocols
Supported links
Rocket Proxy recognises the following share-link schemes. Paste, scan, or import any of them and the app builds the server for you:
Subscriptions are supported too: a sub://<base64> link, a plain https:// subscription endpoint, or a clash://install-config?url=… link all import their servers in bulk.
Automation
Deep-link commands
Rocket Proxy responds to URL commands so you can drive it from Shortcuts, other apps, or a web page. Use the rocketproxy:// scheme (rocket:// and shadowrocket:// also work for compatibility).
| Command | What it does |
|---|---|
rocketproxy://add/{link} | Add a server, sub:// subscription, or https:// subscription URL from the payload. |
rocketproxy://config/add/{url} | Download and install a config from a URL. |
rocketproxy://install?module={url} | Install a module (e.g. an .sgmodule) from a URL. |
rocketproxy://connect | Start the VPN. |
rocketproxy://disconnect | Stop the VPN. |
rocketproxy://toggle | Toggle the connection on/off. |
rocketproxy://connectivity-test | Run a connectivity test. |
rocketproxy://route/proxy | Switch routing to Proxy Everything. |
rocketproxy://route/direct | Switch routing to Direct. |
rocketproxy://route/config | Switch routing to Smart (Config). |
rocketproxy://update-subs | Refresh all subscriptions. |
Combine these in the Shortcuts app to build one-tap automations — for example, connect and switch to Proxy Everything when you join a specific Wi-Fi network.
Configs & rules
Config files & routing rules
Open a config file with Rocket Proxy (from Files, Mail, or “Open in…”) and it's imported automatically. Supported file types:
A file that's simply a list of share links (one per line) is imported as servers; anything with sections or directives is treated as a config, rule list, or module. A .mmdb file installs a GeoIP database (Country or ASN, detected from the filename).
Rule types
Config rules match traffic and send it to a policy. Rocket Proxy supports the standard rule types:
Each rule ends in a policy: proxy, direct, or reject (including the reject variants reject-no-drop, reject-drop, and reject-tinygif for silently dropping ads and trackers).
[Rule]
DOMAIN-SUFFIX,ads.example.com,REJECT
DOMAIN-KEYWORD,google,PROXY
GEOIP,US,PROXY
IP-CIDR,192.168.0.0/16,DIRECT
FINAL,PROXY
More tab
DNS, sync & more
Smart DNS
Choose how DNS is resolved: plain UDP, DNS-over-HTTPS (DoH), DNS-over-TLS (DoT), or DNS-over-QUIC (DoQ) — for private, tamper-resistant name resolution.
Ad-blocking & regional rules
Enable on-device ad and tracker blocking, and subscribe to regional RULE-SET lists that keep your routing rules current automatically.
iCloud sync
Keep your servers and settings in sync across your iPhone, iPad and Mac through your private iCloud — nothing is stored on our servers.
Nearby transfer
Send or receive servers directly between nearby Rocket Proxy devices over the local network, no cables or accounts required.
Connectivity test
Run a built-in check to confirm the tunnel is working and your traffic is reaching the internet through the selected server.
Migration
Switching from Shadowrocket
Moving over is straightforward — Rocket Proxy understands the same links, config files, and automation you already use:
- Share links & subscriptions — paste your existing
ss://,vmess://,trojan://,sub://and other links directly. - QR codes — scan the same server QR codes you already have.
- Config & module files — import
.confand.sgmodulefiles with the same rule syntax. - Deep links — the
shadowrocket://scheme is supported, so existing shortcuts and links keep working. - Bulk import — paste a whole list of links, or a subscription, to bring everything across at once.
Because the rule types and policies match what you're used to, your routing behaves the same after import — no need to rewrite your config.
FAQ
Common questions
Make sure you allowed the VPN configuration when prompted (Settings → General → VPN & Device Management). Confirm the server details are correct, then try Connect again. If it still fails, email us the server type and any error shown.
The built-in demo server lets you try Rocket Proxy instantly with no setup. It's shared and testing-only, so it auto-disconnects after about 5 minutes and has a short reconnect cooldown. For everyday use, add your own server or subscribe to Premium.
Start with Smart (Config) — it proxies what needs proxying and keeps local traffic direct. Choose Proxy Everything to force all traffic through the server, or Direct to pause proxying while keeping DNS and ad-blocking on.
No. We collect no data and keep no logs. Your traffic stays on your device and only travels through the server you choose. See our Privacy Policy for details.
Open your Apple Account subscription settings, select Rocket Proxy Premium, and turn off auto-renewal. You'll keep access until the end of the current billing period.